Showing posts with label healthy. Show all posts

Tuesday, February 12, 2013

Breakfast: Baked Oatmeal


Oatmeal is one of my most favorite healthy super-foods. It is so diverse when it comes to baking and cooking with it. As a college student, Baked-Oatmeal is a gift. I get so busy as soon as Monday comes around. The week just flashes by and before I know it, it's Friday. So to keep myself eating healthy throughout the week, I plan out the week's grocery shopping and I roughly plan out my eating plan during the weekend. (Well, at least I try to most of the time.)  That is why Baked-Oatmeal is an ideal recipe for a tasty, healthy, whole and quick breakfast for the mornings. I personally cook it on Sunday evenings and keep it in the fridge in an airtight container. Throughout the week, some mornings I take a serving,
(or two when I am really hungry), or I pack it up to eat later in the morning.


This recipe is really diverse. You can get creative and add different kinds of fresh fruits ,nuts and dried fruits that you desire. One of the best things about this recipe is that it is sugar-free and wheat-free but still so satisfying.

Ingredients:
Yields 6 Servings
  • 1 ripe Banana 
  • 1 Apple
  • 2 Cups Oatmeal
  • 1/3 Cup Mixed Nuts and Raisins
  • 1 tsp Baking Powder
  • 1/3 Cup Honey (Add more or less depending on your desired sweetness)
  • 3 tbsp Butter
  • 1 1/2 tsp Cinnamon
  •  1/2 tsp Sea Salt
  • 1 Egg
  • 2 tsp Vanilla Extract
  • 1 1/2 Cups Water
Instruction:
  1. Preheat Oven at 180C or 375F.
  2. Grease a deep baking dish. (My dish is an 8 inch square dish).
  3. Mix the oatmeal, sea salt, 1/2 the cinnamon and baking powder in a bowl.
  4. In a separate bowl whisk together the melted butter, honey, water, egg and vanilla extract.
  5. Slice the banana and apple. Line the bottom of the greased dish with first the banana, then the apple on top. If your dish is larger, use more bananas or apples needed to properly line the dish.
  6. Sprinkle the other half of the cinnamon on top of the layer banana and apple base.
  7. Pour the mixed dry ingredients over the banana and apple base. Use a fork to properly distribute the oat mixture in the dish.
  8. Pour the wet mixture over the oats in the dish. Use a folk to properly distribute the liquid in the dish.
  9. Sprinkle the rest of the nut and raisin mixture over the top
  10. Place the disk in the oven for about 35-45 minutes or until the top is golden brown.
  11. Let it cool down for 5 minutes, then serve!
Before:


After:


I hope you enjoy this Baked Oatmeal recipe as much as I do. I had a serving this morning with a cappuccino, a banana and an apple for breakfast. It was so delicious :D.


How do you eat your Baked Oatmeal?

Let me know how you it was for you.


Xx

Rati

Monday, February 11, 2013

Chickpea Veggie Burger

Lately I've been craving a BIG, TASTY and YUMMY burger! But I do not like eating fast food burgers. Or fast food in general. I remember about two years ago I ate a McDonald's chicken burger. The burger, I must admit, tasted pretty amazing. Then after I was done eating, I flipped over the food tray sheet to see the calorie information and I saw that the one burger I had eaten was over 800 calories!!! AAAHH! I was kind of disgusted. So you can imagine my excitement when I discovered the veggie burger. Firstly because I really do love beans and vegetables, its filled with lots of healthy nutrients and secondly because it really just TASTES. SO. GOOD!* 

I have shared the recipe of the Black Bean Veggie Burger Patty on a previous post. You can find the recipe by clicking here. The changes I made were that I used Chickpeas instead of Black Beans and I also baked the burger patty instead of frying it. 


Here is the recipe for the rest of the burger:

Friday, February 1, 2013

Sushi Madness!


I love Sushi! I could eat it all day, EVERYDAY!. Making Sushi Maki is surprisingly easy. I remember the first time I made it at a friend's house about two years ago. It was so fun making the Maki roll from scratch and adding the kinds of fillings I wanted. It is a perfect way to spend time with friends or family. It is also an easy way to make something special for your special someone.

Usually Sushi Maki is made by using white rice as a base. At certain restaurants, I know it is possible to request your Maki with brown rice. I decided to give my Maki a new and healthy twist. I very rarely eat rice, so I wanted to find a way to make yummy Maki without using rice. I tried my luck with different kinds of bases in place of rice and on my first try I found that hummus was such a good base for a yummy and filling vegetable sushi Maki.


YUM! Just look at how delicious that looks!!!
 And trust me it tasted just as good. Its really very simple, easy and quick to make. The 3 key things to everything I make ;)

Equipment:
  • Blender
  • Spoon
  • Sushi mat
  • Knife

Hummus Ingredients:
  • 1 can Chickpeas
  • 1/2 teaspoon  Red Pepper
  • 1/2 -  1 teaspoon Cumin
  • 1 - 2 tablespoons of Olive Oil
  • A pinch of Sea Salt
  • Juice of half a medium Lime/Lemon
  • 1 teaspoon Parsley
  • 1 Garlic Clove (optional, for the Sushi Maki I prefer my humus without the garlic)
  • Water or Juice of humus (add as much as needed for the desired consistency. I find for the Maki base, the thicker the mixture the better.)
Sushi Maki Ingredients:
  • Sushi Seaweed sheets (4)
  • 2 medium carrots thinly sliced horizontally
  • 3 celery stalks thinly sliced horizontally
  • 1 big red pepper medium sliced horizontally
  • Lettuce/Spinach/Kale
  • 1/2 a medium avocado thinly sliced horizontally

Instructions:
  1. Place all the Hummus Ingredients in the blender. Let the blender run until all the ingredients are mixed together. You want to have a lumpy and thick hummus consistency. Do not let it get too thin or too smooth.
  2. Place a seaweed sheet on the Sushi Mat. Using the spoon, spread about two heaped tablespoons of the hummus on to the seaweed sheets. Make sure you spread it all the way to the edges. This is so that when you roll up the Maki it will stick and close properly.
  3. Add the thinly sliced vegetables on to the hummus spread. Make sure you are placing the vegetables horizontal to the way in which you will roll up the Maki.
  4. Add the lettuce/Spinach/kale on top of the sliced vegetables.
  5. Roll up the Maki using the Sushi Mat.
  6. Slice the Maki roll into sizable pieces.
  7. Grab some chopsticks and enjoy this healthy yumminess!

Have fun with this. Experiment with different kinds of vegetable fillings. You can use this as part of a healthy lunch with some Zucchini noodles on the side (new recipe for this coming soon!).

Let me know what you think :)

Xx


Rati

Friday, January 11, 2013

Spicy Zucchini "Pasta"


This is such yummy goodness, I cannot even fully describe or explain how good it is. The best part is... it is so EASY and QUICK to make. I had it last night for dinner and my taste-buds and tummy were thanking me.  

Zucchini is usually one of my vegetable staples, so I thought, "Why not make some Zucchini pasta!".
And I did.
And it was epic.

The thing that really makes this recipe so great is the sauce that you mix it with. I was feeling creative so I just experimented with the ingredients and spices that I had at home and it turned out quite fantastic.

So without any further delay, here is the recipe:

Equipment:
  • Blender
  • Vegetable Spiralizer (I got mine quite cheap on ebay. The one I use is a small hand held tool. You can buy it here.)
  •  Knife and Cutting Board

Ingredients for "Pasta":
  • 2-3 medium zucchinis
  • 1/4 cup sliced mushrooms
  • 1/2 can of garbanzo beans (or 1/2 cup cooked garbanzo beans)
  • 3 chopped long stalks of celery

Ingredients in the Sauce:
  • 1 small red beet
  • 1/2 large persimmon (or 1 medium peach)
  •  Chili peppers (put as much as you want for the spiciness you desire) 
  • 1/2 teaspoon of red pepper
  • 1/2 teaspoon turmeric (or curry)
  • 250 grams of ripe cherry tomatoes (or 1 medium ripe tomato)
  • 4 juicy dates (optional. Also note that if the dates you have are a bit dry, soak them in water for some time to soften them)
  • 1/4 cup of water. (Eye the amount of water according to the blender contents. Add or decrease the amount of water to ensure a good thick saucy consistency)
  • 1/2 red onion (or normal onion)
  • 1 - 2 garlic cloves


Recipe for "Pasta:

  1. Spiralize the zucchinis
  2. Mix in the chopped vegetables and set the plate/bowl aside

Recipe for Sauce:
  1. Chop the red beet and persimmon.
  2. Place all the sauce ingredients into the blender.
  3. Blend all the ingredients together. remember to start out with a bit of water and keep adding until you reach the desired thick, saucy consistency.
  4. Pour the sauce all over your pasta.
  5. Mix it all together and leave it for about 10-15 minutes for all the flavors to mix and the zucchini to soften a bit.
  6. Eat it all up
Serves: 1 person


Trust me, this pasta is really so yummy. It is a great way to replace actual pasta. The ingredients are almost all raw. Due to the fact that we use mostly natural foods, you will find that you can eat a whole big bowl of "pasta" and feel full and satisfied without the guilt of eating actual pasta. 

This meal is great for both dinner and lunch.

I will definitely be experimenting with different kinds of sauces for the Zucchini Pasta and I will share with you the yummy concoctions I come up with.

I hope the new year has started up great for all of you.

Enjoy.

Xx

Rati :)

Monday, December 31, 2012

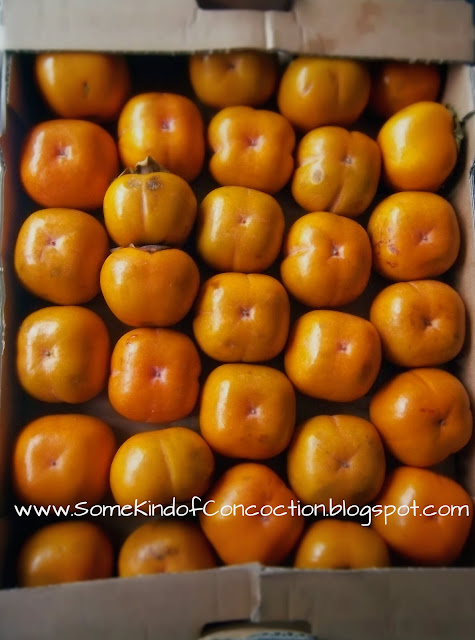
Persimmon Lover


I just got a box yummy PERSIMMONS!!! Since the large part of what I eat constitutes of fruits and vegetables, I try to buy in bulk when I can. It is cheaper and it cuts down my trips to the grocery store.

I recently discovered a new fruit and vegetable market which happens every Saturday in my city. I am excited to go and see all the fresh fruits and veggies I can get at lower prices than at the store.

I hope you have all had an incredible 2012. Mine was definitely filled with so much adventure, the building and breaking of some dear friendships and incredible growth as a person.

I wish you all an amazing 2013. May it be filled with so much more joy, adventure, peace, laughter and love. May it be the best year of your life yet.

Enjoy the New Year celebrations.
Please be safe.

Many hugs and much love.

See you next year ;)

Xx

Rati

Saturday, December 29, 2012

Fitness: Early Morning Inspirations


A few weeks ago I went for an early morning run. It was a day after it had snowed quite a lot and it was just so beautiful out. It was still dark, but I absolutely love running when its still dark.

The streets are empty.
The road is yours.
Its just you.

So, of course,  the run was great! I went for about an hour. I ran about 9km/5.5m at a nice easy pace. I just felt so good. Then it got me thinking, "I think I am about ready to start training and running for a half-marathon". And so that's what I did... I am officially registered to run The Hague, ABN AMRO Half-Marathon on March 10, 2013.

SOOOO EXCITED!
and nervous.
but more excited!

It has always been a dream of mine to run a marathon, but it has always felt so far off and too hard. So I just set the dream aside. Then in December of 2011, I decided to a set small goal and I signed up to run my first 10km race on the 18th of March of 2012 at the Limassol Marathon. I was as excited as I am now about the half-marathon, but I was definitely MUCH more nervous about it. I trained, and I had good weeks and bad weeks of training. But on March 18th, 2012, I ran my very first 10km race and I fell in love with the racing atmosphere, adrenaline and camaraderie among runners. The whole day was just good vibes.

But after that 10km race, I sort of felt I was done with training specifically for running. I wanted to focus more on general fitness. Which I did. I started weightlifting and I absolutely love it. I experimented with other sports like rock climbing and hiking. I experimented with all sorts of fitness, which I enjoyed very much.

I needed to give myself this change to challenge my body in new ways of fitness, but I would always go back to running. There really is nothing like the run. You catch the rhythm of your feet and push yourself mentally and physically beyond where you thought you could possibly go.

And so.. here I am, once again registered to another race. This time the race is a half-marathon. I am currently in week one of training and it is going really great. I will keep you updated.

My dream of running a marathon just feels so much closer. It can be a reality and it feels good!

I am so happy and prod of myself at how far I have come.

I am a runner and I love it!

xX

Rati

Sunday, December 2, 2012

Sandwich on the Go!


Dear Avocados, I love you! :D

They are a creamy ,wonderful and healthy goodness. A gift to our taste buds. Hahaha! So yes you can see how much I love them. :D

I partly grew up in Zimbabwe, Africa. In our backyard there is an avocado tree. When they were ripe and in season, my brothers and I would always make sure the house was filled with avocados. It was wonderful to just be able to pick avocados out of the tree! Africa is such a gift in that way.

So having avocados around, I found many ways to use them. This is a really quick and very easy recipe. I know for a fact we all just don't always have time to make an extravagant meal and I don't enjoy spending numerous hours in the kitchen making a meal. But just because a meal is quick it doesn't mean it cant be absolutely delicious.

So here's a recipe to a quick  and easy lunch on the go.

Ingredients:


  • 2 Slices of whole grain bread (or 1 slice, if you want to make an open sandwich)
  • 1/3 of a medium sized avocado
  • 1 handful spinach
  • Thin Cucumber slices
  • 2 tablespoons cottage cheese
  • 2 slices lunch meat (It can be turkey, beef or chicken. Even meat leftover from dinner last night. Whichever makes your taste buds happy)
  • Black pepper to sprinkle (optional)
  • Parsley to sprinkle (optional)
  • Sriracha Hot Sauce (optional)

Recipe:

  1. Toast bread until tender and crispy
  2. Spread cottage cheese
  3. sprinkle black pepper and parsley
  4. Add cucumber slices and spinach
  5. Slice the avocado and place on bread
  6. Sprinkle Sriracha on top if desired
  7. Close the sandwich up and ENJOY!
So simple. So good. So healthy. So filling.

I hope you enjoy this simple yummy sandwich.

Xx

Rati


Black Bean Burger


Simply put, I love food.
Not all food.
I love good, wholesome, healthy, unprocessed food.
I love exploring new flavors and tastes.
And I love doing it the healthy way.

I am not a vegan or vegetarian. But I really really love and eat so many veggies.
I do enjoy a good steak or grilled chicken. But I feel there are more flavors and recipes and tastes to explore outside of meat.

Yesterday I made my very first Black Bean Veggie burger... SOOO GOOOD!!!
It smelt so good and I was so hungry so I took bite out of the pattie on the right just before I snapped a shot :D haha!

This whole meal is simple and easy to make. I have the recipe for you below.
It is both light and very filling.

Ingredients:

1 can of Black Beans (or Chickpeas or cook your own beans)
1 handful of diced mushrooms (whatever kind you like the most)
1/2 red onion diced (any kind onion will do really)
3 garlic cloves finely chopped(add more or less according to how much you like your garlic )
1/2 diced green pepper
2 tablespoons of sweet corn
1 cup oatmeal (you can also use flour)
2 tablespoons of olive oil (or any kind of cooking oil you prefer)
1 tablespoon Chili powder
1 tablespoon Dijon Mustard (optional)
1 teaspoon Sriracha Hot Sauce (or any kind of hot sauce you like)
1 teaspoon curry
1-2  eggs

Recipe:

  1. (If baking preheat the oven at 180C or 385F)
  2. Drain the black beans. (Don't throw away the juice. you can drink it or drizzle of a salad later.) Mash the beans with a folk in a bowl and until its mashed pretty well. After mashing the beans, stir in the sweet corn
  3. Put a 1 tablespoon of olive oil in a pan (or use a cooking spray). Add the onions, garlic, green peppers and mushrooms. and cook until onions are translucent. 
  4. Whilst you wait for the cooked stuff to cool down a bit, mix 1 egg, hot sauce, chili, curry and mustard in a small bowl.
  5. Pour the egg mixture, oatmeal and cooked ingredients into the mashed beans and mix it all together. The mixture should be sticky and stay together well. You may need to add more oatmeal to get to a good paste or an extra egg if it is too dry. Set the mixture aside for about 5-10mins for the flavors to really mix well and for the excess liquid to be soaked by the oatmeal
  6. Whilst you wait you can make a quick spinach salad. just toss together a cup of spinach, some sweet corn, a bit of feta, cherry tomatoes and drizzle some balsamic vinegar.
  7. Now take the mixture and mold it into patties. This recipe should make about 6 medium sized patties. 
  8. If frying in a pan. Put a tablespoon of oil in the pan and place the patties in to cook on both sides.
  9. If you are baking place the patty in the over for 20 minutes or until crispy on the outside. Flip the burger after 10 minutes.)
  10. Then serve it with your spinach salad and, if you like, sprinkle a bit of cheese on top as a treat ;)
Note that you can always freeze the patties you don't want to cook yet for later. I made 6 patties. I cooked some and froze the other patties to cook later during the week.

You can always experiment with this burger by adding different kinds of cooked vegetables, but remembering to keep correct proportions.

I hope you enjoy it as much as I did.

Xx

Rati